If you own a MediaTek running device and wish to customize it to gain admin-level controls then here is exactly where you should be. In this article today, we will be sharing with you all a guide on How to Root MediaTek Device Using SP Flash Tool.
MediaTek is one of the most popular chipsets that many smartphone devices especially Xiaomi smartphones use. With their increasing popularity, customization has become increasingly important.
Contrary to earlier times, now it has become pretty easy to customize and access admin-level controls of your device. Consequently, we also have various options today these MediaTek devices can use to customize.
However, we all know very well that the dominant chipset, Snapdragon, has more options for tweaking and customizing. Hence, those owning a MediaTek device might feel that their scope for customization is quite limited.
But let me break the bubble of myth for you. While it is true that Snapdragon devices have more options as compared to MediaTek ones, we have a great tool for our rescue.
SP Flash Tool is one such tool that helps MediaTek users as it can flash stock ROM, flash a custom recovery like OrangeFox recovery, or TWRP Recovery, and even format all the data on your device.
Here is a guide on how to Install TWRP on MediaTek using SP Flash Tool. This is a great tool that makes things much easier for those having a MediaTek device.
Now that you know which tool we will be using today, here is a complete detailed guide on how to use SP Flash tool to root MediaTek devices.
How to Root MediaTek Device Using SP Flash Tool
So if you are wondering what exactly are we doing here, then, first of all, we will get the stock boot.img file. Then we will patch this file to get the magisk_patched.img.file.
After that, we will flash this file using the SP Flash tool on your MediaTek device. and that’s it. You have Root MediaTek Device Using SP Flash Tool.
But first, you will have to perform the below requirements to get the further process going on.
Prerequisites
- Download SP Flash Tool using the link given below. Then extract this tool to any location on your PC that you find suitable.
- Download MediaTek USB Drivers. After you download these, open the setup.exe file and follow the instructions given on the screen.
Root MediaTek device using SP Flash Tool
Assuming that you have followed the above prerequisites, we will proceed further with the next steps.
Step 1. Download MediaTek device Stock Firmware
Now, we will have to download the Stock firmware of your device for the same firmware version, your device is currently running on. For this, you can go to Settings > About Phone and check the current Build Number of your device.
Now you will mostly find the Stock Firmware on the official website of your OEM. However, if your firmware does not have it listed, then you can download it from other reliable sources.

Step 2. Extract MediaTek boot. img from Stock Firmware
Mostly the firmware file of an OEM comes in ZIP format. So you can extract it using WinRAR or WinZIP.
For Xiaomi devices, the firmware will come in TGZ format. You can extract it using WinRAR.
Note that some devices like Realme have the firmware in OZIP format. So for such devices, you will have to use the tool for extracting accordingly.

Step 3. Patch Stock Boot.img via Magisk
Now comes the step where we patch the stock boot img using Magisk together Magisk_patched.img.file. for this, follow the below guides –
- First of all, move the stock boot.img file to your device.
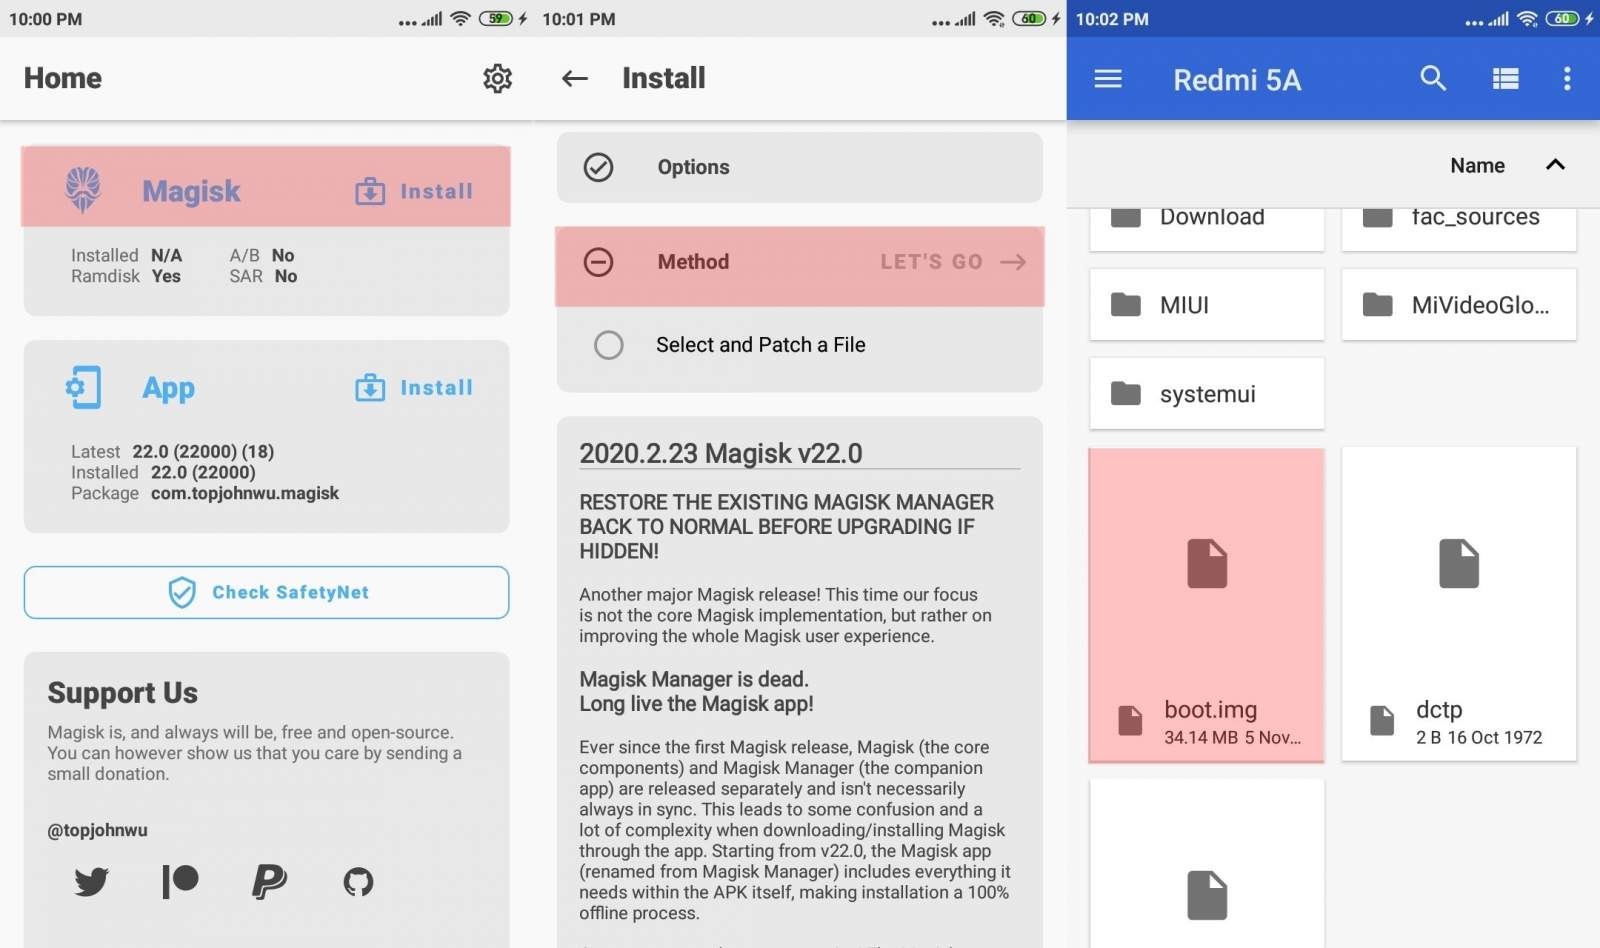
- Now download and install Magisk Manager app on your device. Open the app.
- Tap on the Install option present next to Magisk.
- Then tap on Select and Patch a file.
- Now go to boot.img file and select it.
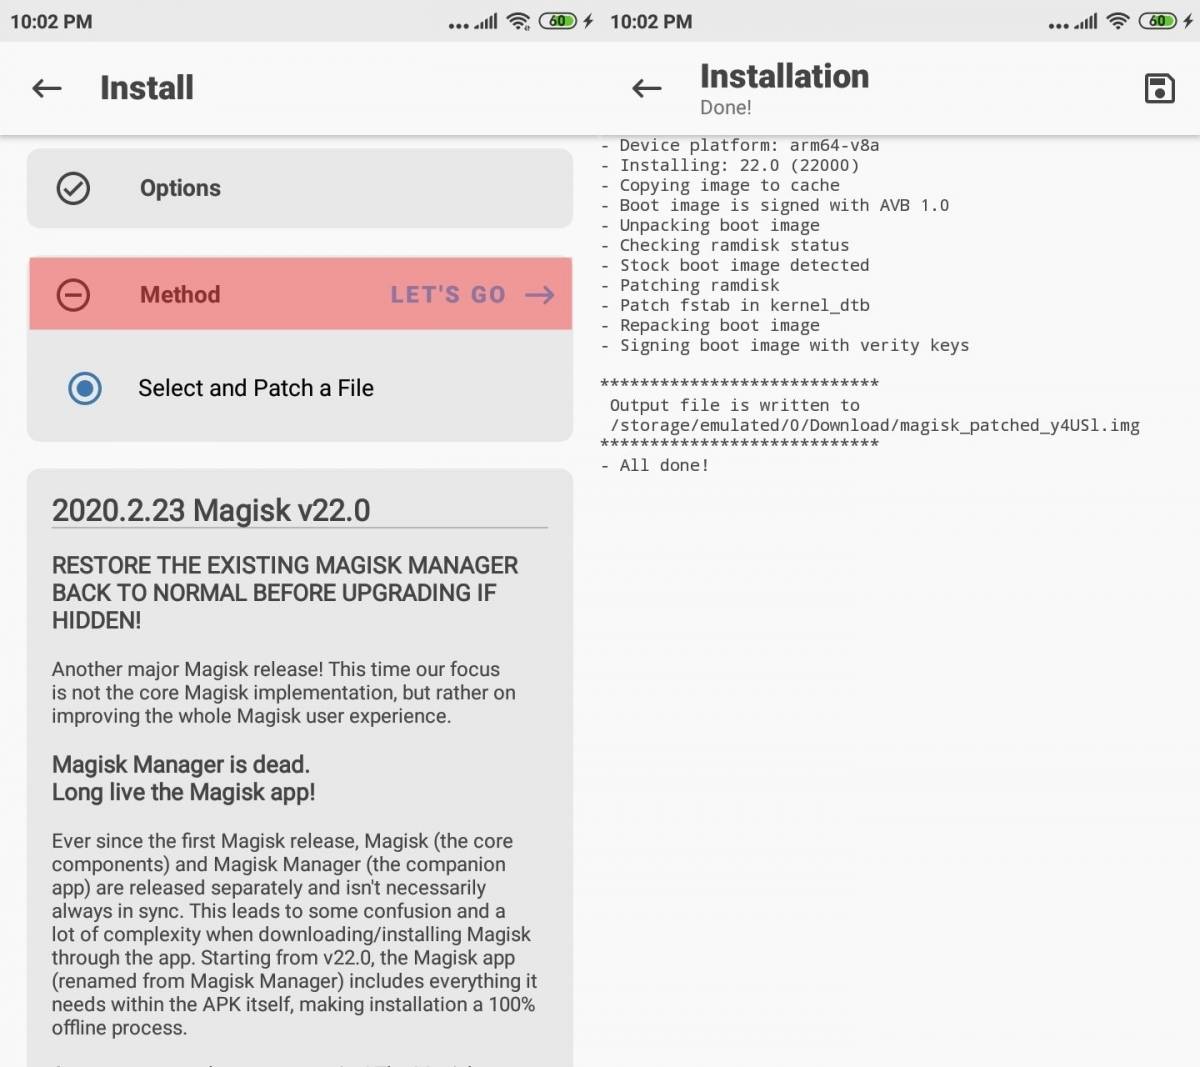
Soon the boot.img file will be patched and you will get Magisk_patched.img.file. Simply transfer this file to the PC.
Step 4. Replace Stock Boot. img with Patched Boot. img
- Rename Magisk_patched.img.file to boot.img
- Now move this file to the folder where you have saved the stock firmware.
- You will be asked if you want to replace the existing file. Click on Yes or Ok.

Step 5. Connect MediaTek Device to SP Flash Tool
- To connect your device to the SP Flash tool, firstly, open the SP flash tool on your PC.
- Now you can connect your device to the PC using 2 different ways –

Method 1.
- Switch off your device.
- Connect to the PC and press the Volume down button once.
Method 2.
- Switch off your device.
- Connect one end of the USB cable to the device and press and hold the Volume Up and Volume Down button together and while you are pressing these buttons together, connect the other end of the USB cable to the PC.
Step 6. Flash MediaTek Device’s Magisk Patched Boot. img via SP Flash Tool
After you have connected your device to the PC, check that the SP Flash tool recognizes your device. Also, check that you have followed all the processes mentioned above carefully so as to not get into any trouble further.
- To start with, open the SP Flash tool.
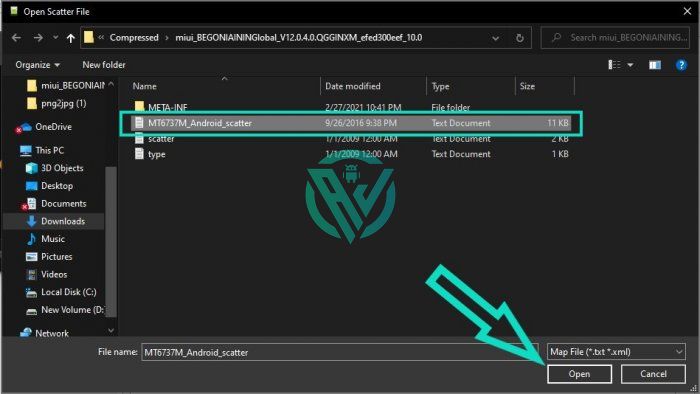
- Click on the Choose button present next to the Scatter-loading file.
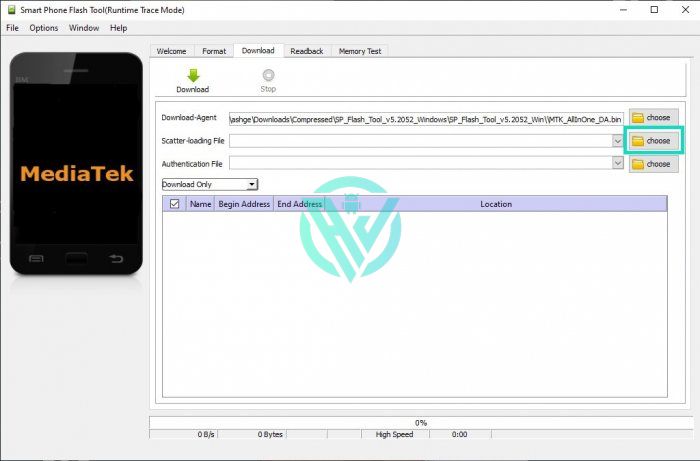
- Now navigate to the folder where you have saved the extracted stock firmware.
- Here, you will find the scatter.txt file. Click on it to open.
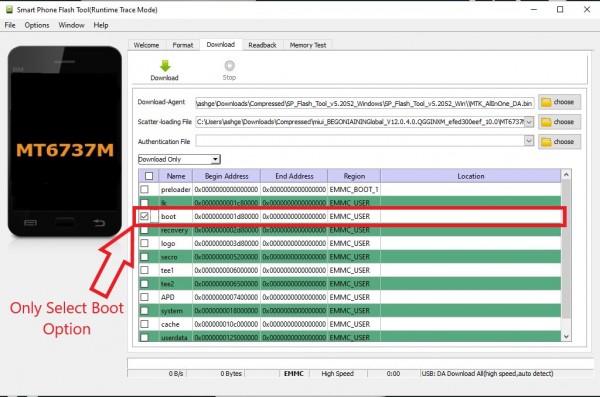
- You will now see all the partitions on the screen. Simply uncheck all the partitions except boot.
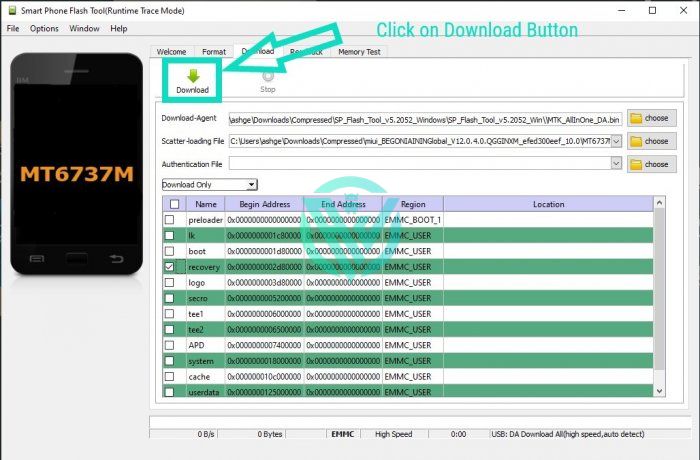
- Now hit the download button present at the top left side.
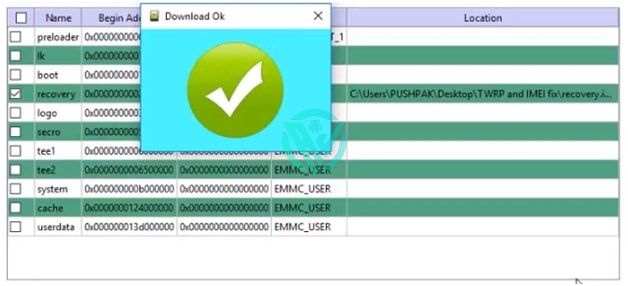
Once the download finishes, you will receive a Download Ok message on the screen. You can now disconnect your device from the PC.
frequently asked questions for Root Mediatek Devices
Can I Root my MediaTek Phone without SP Flash Tool?
Although SP Flash Tool is meant for the purpose of flashing stock firmware and custom recoveries, etc, one can actually root MediaTek device without the SP Flash tool.
Here’s how you can do this –
- Firstly, we will get the stock boot.img file.
- Then we will patch this file using Magisk to get the magisk_patched.img.file.
- After that, we will patch this file to the boot partition using the fastboot flash boot magisk_patched.img command.
How do I flash my MediaTek device?
- Switch off your Mediatek device.
- Connect Mediatek Device to the PC using the USB Cable.
- Once connected, Press Volume Down or Volume Up key, so that your device Flash Tool can detect the device.
- Once the PC detects your Device, the Flashing process will Start Automatically.
How do I flash a dead MediaTek phone?
- Open SP Flash Tool on your PC.
- Click On “Scatter Loading”.
- Select your Scatter File.
- Connect Your device using a USB cable while holding the volume down or volume up button and click on Download.
- The flashing process will now begin.
Concluding Words
Rooting a device might seem a little too much for some users but for those advanced level android users who are familiar with it know that they can access the admin level control of their device with rooting.
If you are such a person who would not care much about the device warranty and want to customize their device to its fullest.
I hope you all could easily root the MediaTek device with the SP Flash tool. For any doubts that you have, feel free to contact us via the comment section given below.
We would recommend you bookmark this page for further references!
Happy Rooting:-)
