In this article, we will be sharing how to Disable DM-Verity or Android Verified Boot without TWRP. Android’s Open source nature makes it easier for tech geeks to customize and modify their devices according to their needs. This comes as one can Root Android to gain admin-level access to their device.
They can also install custom recoveries like TWRP Recovery, OrangeFox recovery, and so on. No doubt, such customizations offer much liberty to the user, but at the same time, they make your device vulnerable to many malicious apps.
Now, although many users can decide for themselves by simply not installing such obvious culprit apps, Google has come up with a safeguard to the problem.
For Security, Google has come up with Device Mapper Verity or DM Verity. This mechanism abstains such apps that could be harmful to your device from conducting any process.
Even though this is an appreciative step, most rooted users know pretty well what’s good and what isn’t for them. The whole DM Verity process only limits Advanced users further.
Although TWRP is one of the best things one can do on their device, there are also other ways to perform these tasks. For example, let us take – one can also Root their device without TWRP Recovery. So if so many processes can be carried out without TWRP recovery, why not disabling dm-verity without TWRP?
If you are wondering, then yes, you can easily disable dm-verity, i.e. disable Android verified boot without TWRP using the below guide. Follow further.
What is dm-verity encryption?
DM is the abbreviation for Device Mapper. This Linux Kernel framework verifies the integrity of every device block by reading from the disk. In simpler words, dm-verity encryption checks malicious attacks.
Now that you know what dm-verity encryption means, you can bypass dm-verity encryption using the guide below.
How to Disable DM-Verity or Android Verified Boot without TWRP
If we are to speak traditionally, most of the customization processes depended mostly on the most popular custom recovery – TWRP Recovery.
However, thanks to our developers, the scenario now seems to be changing as many processes can now be followed without TWRP Recovery. Let us take, for example; you can now Root without TWRP Recovery.
So if you root a device without TWRP Recovery, you can for sure perform other actions without using it.
Given below is a step-by-step guide on how to disable DM Verity or AVB without TWRP Recovery. Make sure to follow each of the below steps in the same given sequence and utmost attention.
Step 1 Get Stock Boot Image file.
To get the Stock Boot img file, you will have to first download the stock firmware for your device, which you will find on the official website of your device.
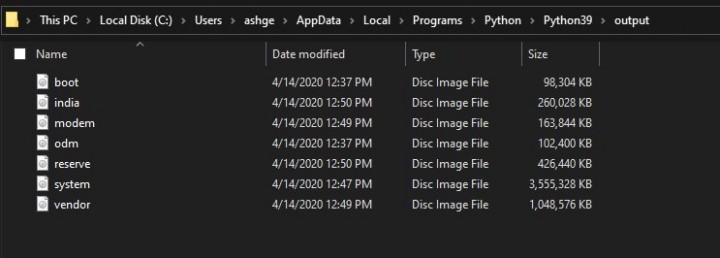
Note – Make sure that the firmware version corresponds to the version of your device.
Once you have downloaded the stock firmware, extract the file using WinRAR or WinZip. And you will get the Stock Boot IMG file. You can then proceed to the next steps. For the Xiaomi device and its GZ Format, you can rename it to TGZ and then extract the file using 7ZIP.
Step 2 Install Android SDK Platform-tools and Install Magisk Manager
Using the link given below, install ADB and Fastboot tools on your PC. These tools will give you the necessary ADB and Fastboot binary files.
Download And Install ADB and Fastboot on Windows, Linux, Mac.
Next, you will also have to install Magisk Manager. For this, you can use the below link –
Download Magisk zip and Magisk Manager
Step 3 Enable USB Debugging
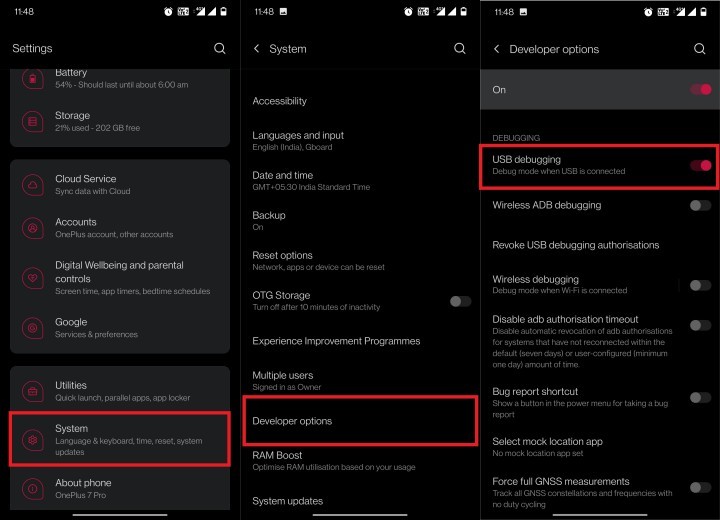
To proceed further, you will have to Enable USB Debugging on your Android device.
For this, you can go to Settings > About Phone > Tap on Build Number 7 times > Go back to Settings > System > Advanced > Developer Options > Enable USB Debugging.
Step 4 Disable Preserve AVB 2.0/dm-verity
- To disable Preserve AVB 2.0/dm-verity, open the Magisk Manager app on your device.
- In the app, tap on Advanced Settings and then untick Preserve AVB 2.0/dm-verity. This will disable Preserve AVB 2.0.
-

disable avb 2.0 dmverity magisk
Once you have followed this step, you can proceed further to the next step.
Step 5 Patch Stock Boot Image file – Disable DM-Verity
Next is to patch stock boot.img file using Magisk. For this, follow the below steps
- To start with, move the stock boot.img file which you downloaded in step 1 to your device.
- Then, open Magisk Manager.
- On the main menu, tap on the Install option.
- A pop-up will appear on the screen. Again tap on the Install option from it.
-
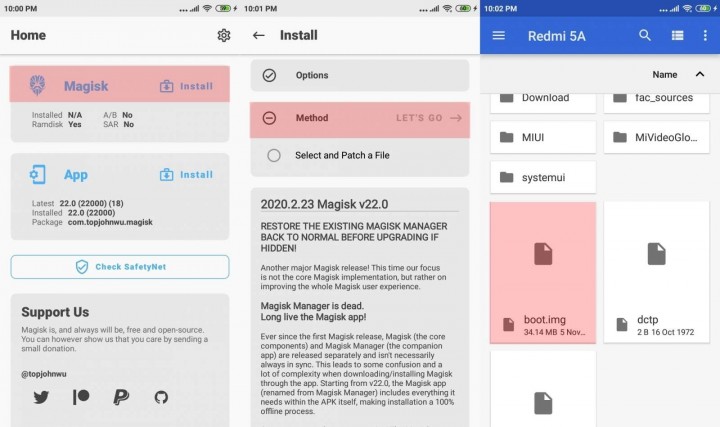
patch-stock-boot-image-disable-dmverity-avb - A new pop-up asking you to Select Method will appear on the screen.
- Choose Select and Patch a file.
- Now go to the stock boot.img file and choose it.
- For Samsung devices, this file will be in the form of a .tar file.
- The patching process by Magisk should now begin.
-
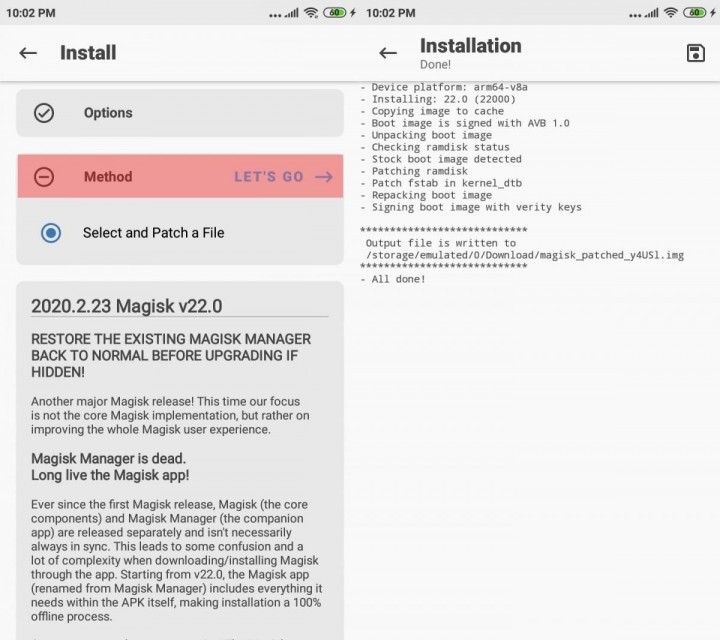
patch-stock-boot-magisk-disable-dmverity-avb - In a few minutes, the process will be finished, and Magisk_patched.img. The file will be saved in the Internal Storage > Downloads.
- Lastly, move this file to the Platform Tools folder and proceed with step 6.
Step 6 Flash Patched BOOT IMG File/ Disable DM Verity
To disable DM Verity or Android Verified Boot (AVB) without TWRP Recovery, we will have to flash the Patched boot IMG file. We will be doing this using Fastboot Commands. Follow the below steps.
- Connect your device to the PC with the help of USB Cables.
- Next, make sure that you have Enabled USB Debugging.
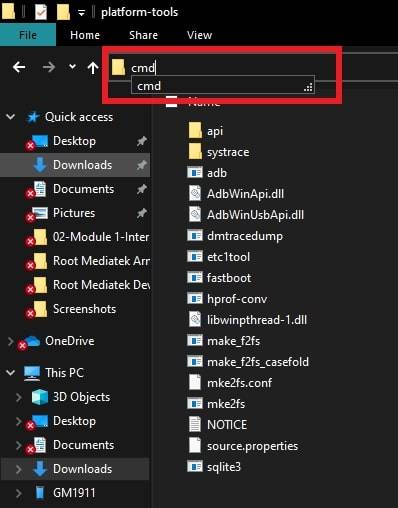
- On your PC, go to the Platform Tools folder and enter cmd in the address bar. This will open a command prompt.
-
command-prompt-ADB - Enter the below command to boot into Fastboot mode on your device and then hit the enter key to execute the command
adb reboot bootloader
- Enter the below command to flash Patched magisk boot img and hit the enter key.
fastboot flash boot magisk_patched.img
- Using the below command, you can now reboot your device –
fastboot reboot
That is it. You are done here. You have successfully disabled DM-Verity or AVB without using TWRP Recovery.
Concluding Words
I hope you all could easily Disable DM-Verity or Android Verified Boot without TWRP. However, Device Mapper or DM Verity is a security mechanism used to prevent rootkits that can use root privileges and compromise devices.
Especially if you are a newbie, this security mechanism is very helpfully. However, those with enough rooting knowledge and a sense of right and wrong root apps might find this security mechanism annoying and wish to bypass dm-verity without TWRP.
If there is any step at which you are stuck in the above process, do not hesitate to ask us in the comment section below. We will get back to you as soon as possible.
Also, if you wish to receive more such informative articles on any Android-related topics, your suggestions are most welcome.
Happy Androiding:-)
