For all the Redmi K20 Pro Users here’s great news – TWRP Recovery unofficial build is now available for Redmi K20 Pro. In this article, we are sharing with you the methods to install TWRP recovery and root Redmi K20 Pro with the help of Magisk. So here we go –
Redmi K20 Pro is a Xiaomi device with a Snapdragon 855 processor and some really cool features. You will find a 6GB RAM in this device. The device runs on the latest MIUI Android Pie 9. However, there are still some faults which users are preferring to get away from by installing a Custom ROM or rooting the device.
Hence, one of the XDA developers released an unofficial build of TWRP Recovery for Redmi K20 Pro. This Build is claimed to be much stable supporting encryption of data partition. Rooting your device using Magisk will give additional benefits with TWRP recovery. So if you are ready, we can proceed further –
This article is for knowledge purpose only. Rooting any device is a risky process and it must be done only by those who have some basic knowledge about rooting.
Prerequisite to root Redmi K20 Pro –
- Have at least 70% charging on your device.
- Unlock the bootloader of your Redmi K20 Pro.
- Download and install the latest USB Drivers for Redmi K20 Pro.
- Make sure that you have a complete backup of all your device data since all of it will be wipe when you perform this process.
Download
Click on the files below to download –
- Download ADB Fastboot tool.
- Unofficial TWRP Recovery for Redmi K20 Pro twrp-3.3.1-1-Raphael.img
- Install Magisk.
Install TWRP Recovery on Redmi K20 Pro
Follow the below guide to install TWRP Recovery on Redmi K20 Pro –
Step 1. To begin with, Download TWRP Recovery img file.
Step 2. With the help of a USB Cable, connect your K20 Pro with the PC.
Step 3. Locate the ADB and Fastboot folder on your PC and move the downloaded TWRP recovery img file to this folder.
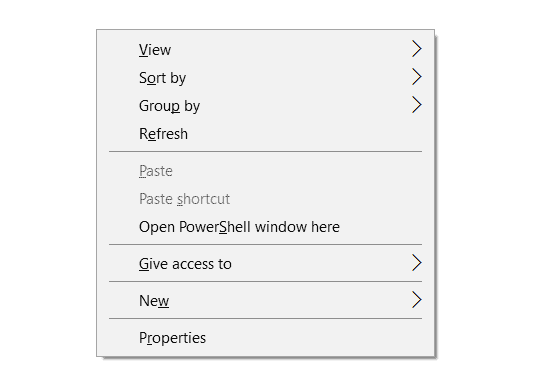
Step 4. On the blank space in this folder, press the Shift key and right-click. This will open a list of options, of which, select Open PowerShell Window here.

Step 5. Now to enter into the fastboot mode, hold down the Power Button and Volume Down button on your K2 Pro.
Step 6. Enter the code given below so as to install TWRP Recovery on K2 Pro.
fastboot flash recovery recovery_name.img
Step 7. Make sure to replace the ‘recovery_name‘ with the file name that you have downloaded earlier.
Step 8. Once you have entered the command given above, the unofficial TWRP Recovery build will be installed on the Redmi K2 Pro. Just don’t reboot the Android device now.
Step 9. To boot K20 Pro in TWRP Recovery mode, press and hold down the Power button until the screen turns blank. And when you see the screen is turned black, press and hold the Power button and Volume Up button together.
Once you have successfully booted the Redmi K20 Pro into TWRP Recovery, you are all set to root it using Magisk.
Root Redmi K20 Pro
Step 1. To start with, install the Magisk Installer zip file.
Step 2. Now connect your K20 Pro to the PC using USB Cable.
Step 3. In the TWRP Recovery menu, go to ‘Mount’ and then click on the ‘Enable MTP’ option.
Step 4. Copy the zip file of Magisk Installer to the Internal storage of your device.
Step 5. Then go back to the TWRP main screen and then tap the ‘Install’ option.
Step 6. Here, from the available options, choose Magisk-v19.3 zip file.
Step 7. Now you will be asked to confirm your action, just swipe to do so.
You can now reboot your device by selecting the same option and then clicking on System. Once your device is rebooted, it will be rooted with Magisk. You are now all set to make use of this rooted device as much as you want.
You can use the Magisk Hide option that will help you hide from root-detecting apps. You can tweak your Kernal using the Kernal Auditor and so on.
Final Verdict –
That was it about TWRP recovery unofficial build for Redmi K20 Pro and how you could root Redmi K20 Pro using Magisk. Stay tuned with us for more such updates.
